The Best Easy Banana Pudding Recipe – From Scratch or Instant
Why This Easy Banana Pudding Recipe Works
- Two methods included: homemade from-scratch custard AND a quick instant pudding version, so you can choose based on your time
- Tested layering technique: the right order keeps wafers soft but not soggy, and bananas fresh without browning
- Make-ahead friendly, it actually tastes better the next day, making it ideal for entertaining
- No special equipment: just a saucepan, a whisk, and a baking dish
*This post contains affiliate links. If you purchase through these links, we may earn a small commission at no extra cost to you.
What Is Banana Pudding?
Banana pudding is a classic American layered dessert that has been a staple of Southern cooking for well over a century. At its core, it is built from three components: a creamy vanilla custard (or pudding), sliced fresh bananas, and vanilla wafer cookies, all layered together in a dish and chilled until set. The cookies absorb moisture from the custard as it rests, transforming into soft, almost cake-like layers that meld with the banana and cream into one cohesive dessert. According to food history archives at Southern Living, banana pudding has appeared in American cookbooks since the late 1800s, cementing its place as a true Southern classic.
What makes this easy banana pudding recipe so enduring is how it balances simplicity with comfort. It requires no baking (only gentle stovetop cooking for the from-scratch version), no special equipment, and ingredients that are available everywhere. Yet the result is a dessert that feels both nostalgic and indulgent, a combination that few other recipes can match.
| Feature | From-Scratch Custard | Instant Pudding Version |
|---|---|---|
| Flavor depth | Rich, eggy, deeply vanilla | Light, sweet, artificial-vanilla |
| Active time | ~15 minutes on the stove | ~5 minutes total |
| Difficulty | Moderate (needs attention) | Very easy (no cooking) |
| Texture | Dense, creamy, custardy | Light, soft, mousse-like |
| Best for | Special occasions, hosting | Weeknights, quick cravings |
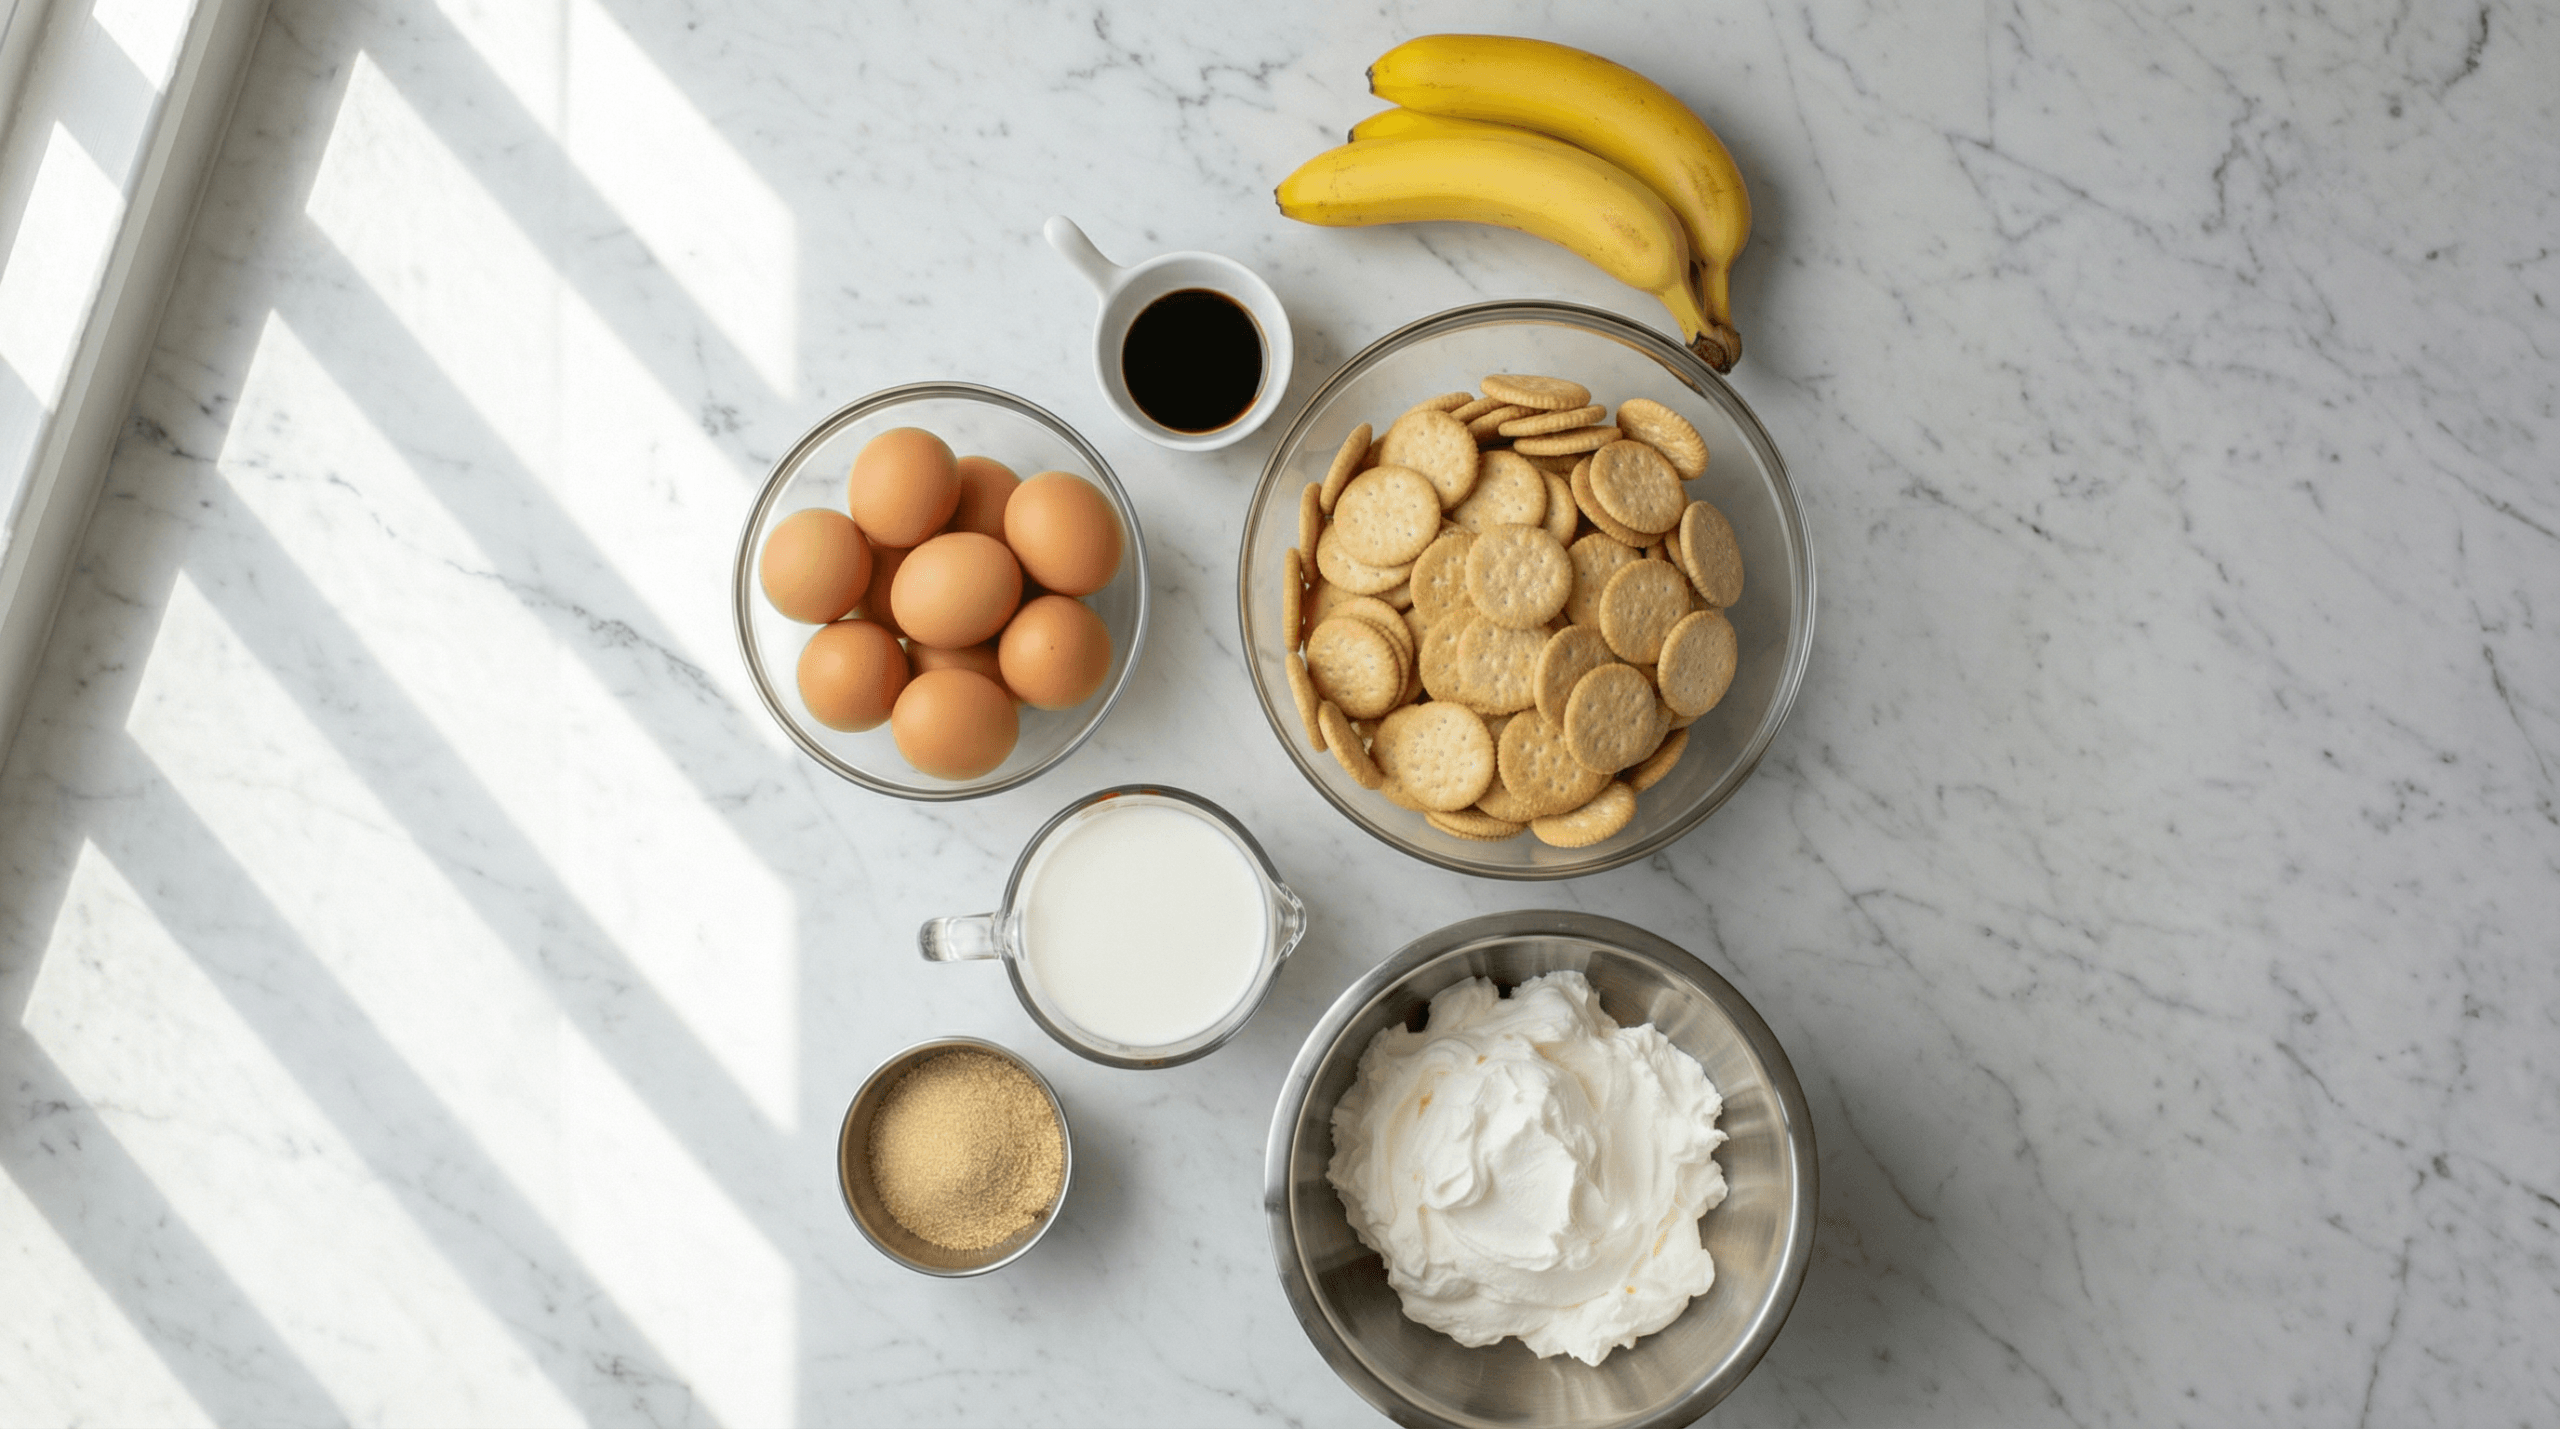
Easy Banana Pudding Recipe Ingredients
Both versions of this easy banana pudding recipe use the same base of bananas and Nilla Wafers. The custard layer is where they differ. Below are the complete ingredient lists for both methods.
From-Scratch Custard (Best Flavor)
- Whole milk (3 cups / 720ml): Full-fat milk creates the richest custard. Do not substitute skim or low-fat milk, as the fat content is important for the right texture.
- Granulated sugar (¾ cup / 150g): Sweetens the custard base.
- All-purpose flour (⅓ cup / 40g): The thickening agent for the custard. Flour creates a sturdier, more sliceable custard than cornstarch alone.
- Salt (¼ teaspoon): Balances and amplifies all the other flavors.
- Egg yolks (3 large): Add richness, body, and the classic eggy custard flavor that defines from-scratch banana pudding.
- Unsalted butter (2 tablespoons): Stirred in off heat for extra richness and a glossy finish.
- Pure vanilla extract (2 teaspoons): Use pure extract, not imitation, as it makes a significant difference in the final flavor.
Instant Pudding Version (Quick & Easy)
- Instant vanilla pudding mix (2 packages, 3.4 oz each): Two boxes create enough volume for a full 9×13 dish. Vanilla flavor is classic; banana-flavored pudding mix can also be used for a stronger banana taste.
- Whole cold milk (3 cups / 720ml): Must be cold for the pudding to set properly. Cold milk activates the starches in the mix more effectively.
- Cream cheese (8 oz / 225g), softened: Optional but highly recommended. Beaten into the instant pudding mixture, it adds body, richness, and a tang that masks the artificial flavor of the mix.
- Sweetened condensed milk (14 oz can): Stirred in with the cream cheese version for extra depth and creaminess.
For Both Versions (Base Ingredients)
- Ripe bananas (4–5 medium): Look for yellow bananas with light brown speckles, ripe enough to be sweet and flavorful, but not so ripe they become mushy when sliced. The USDA food composition database notes that ripe bananas are significantly higher in natural sugars and lower in starch compared to underripe ones, which is exactly what this recipe needs.
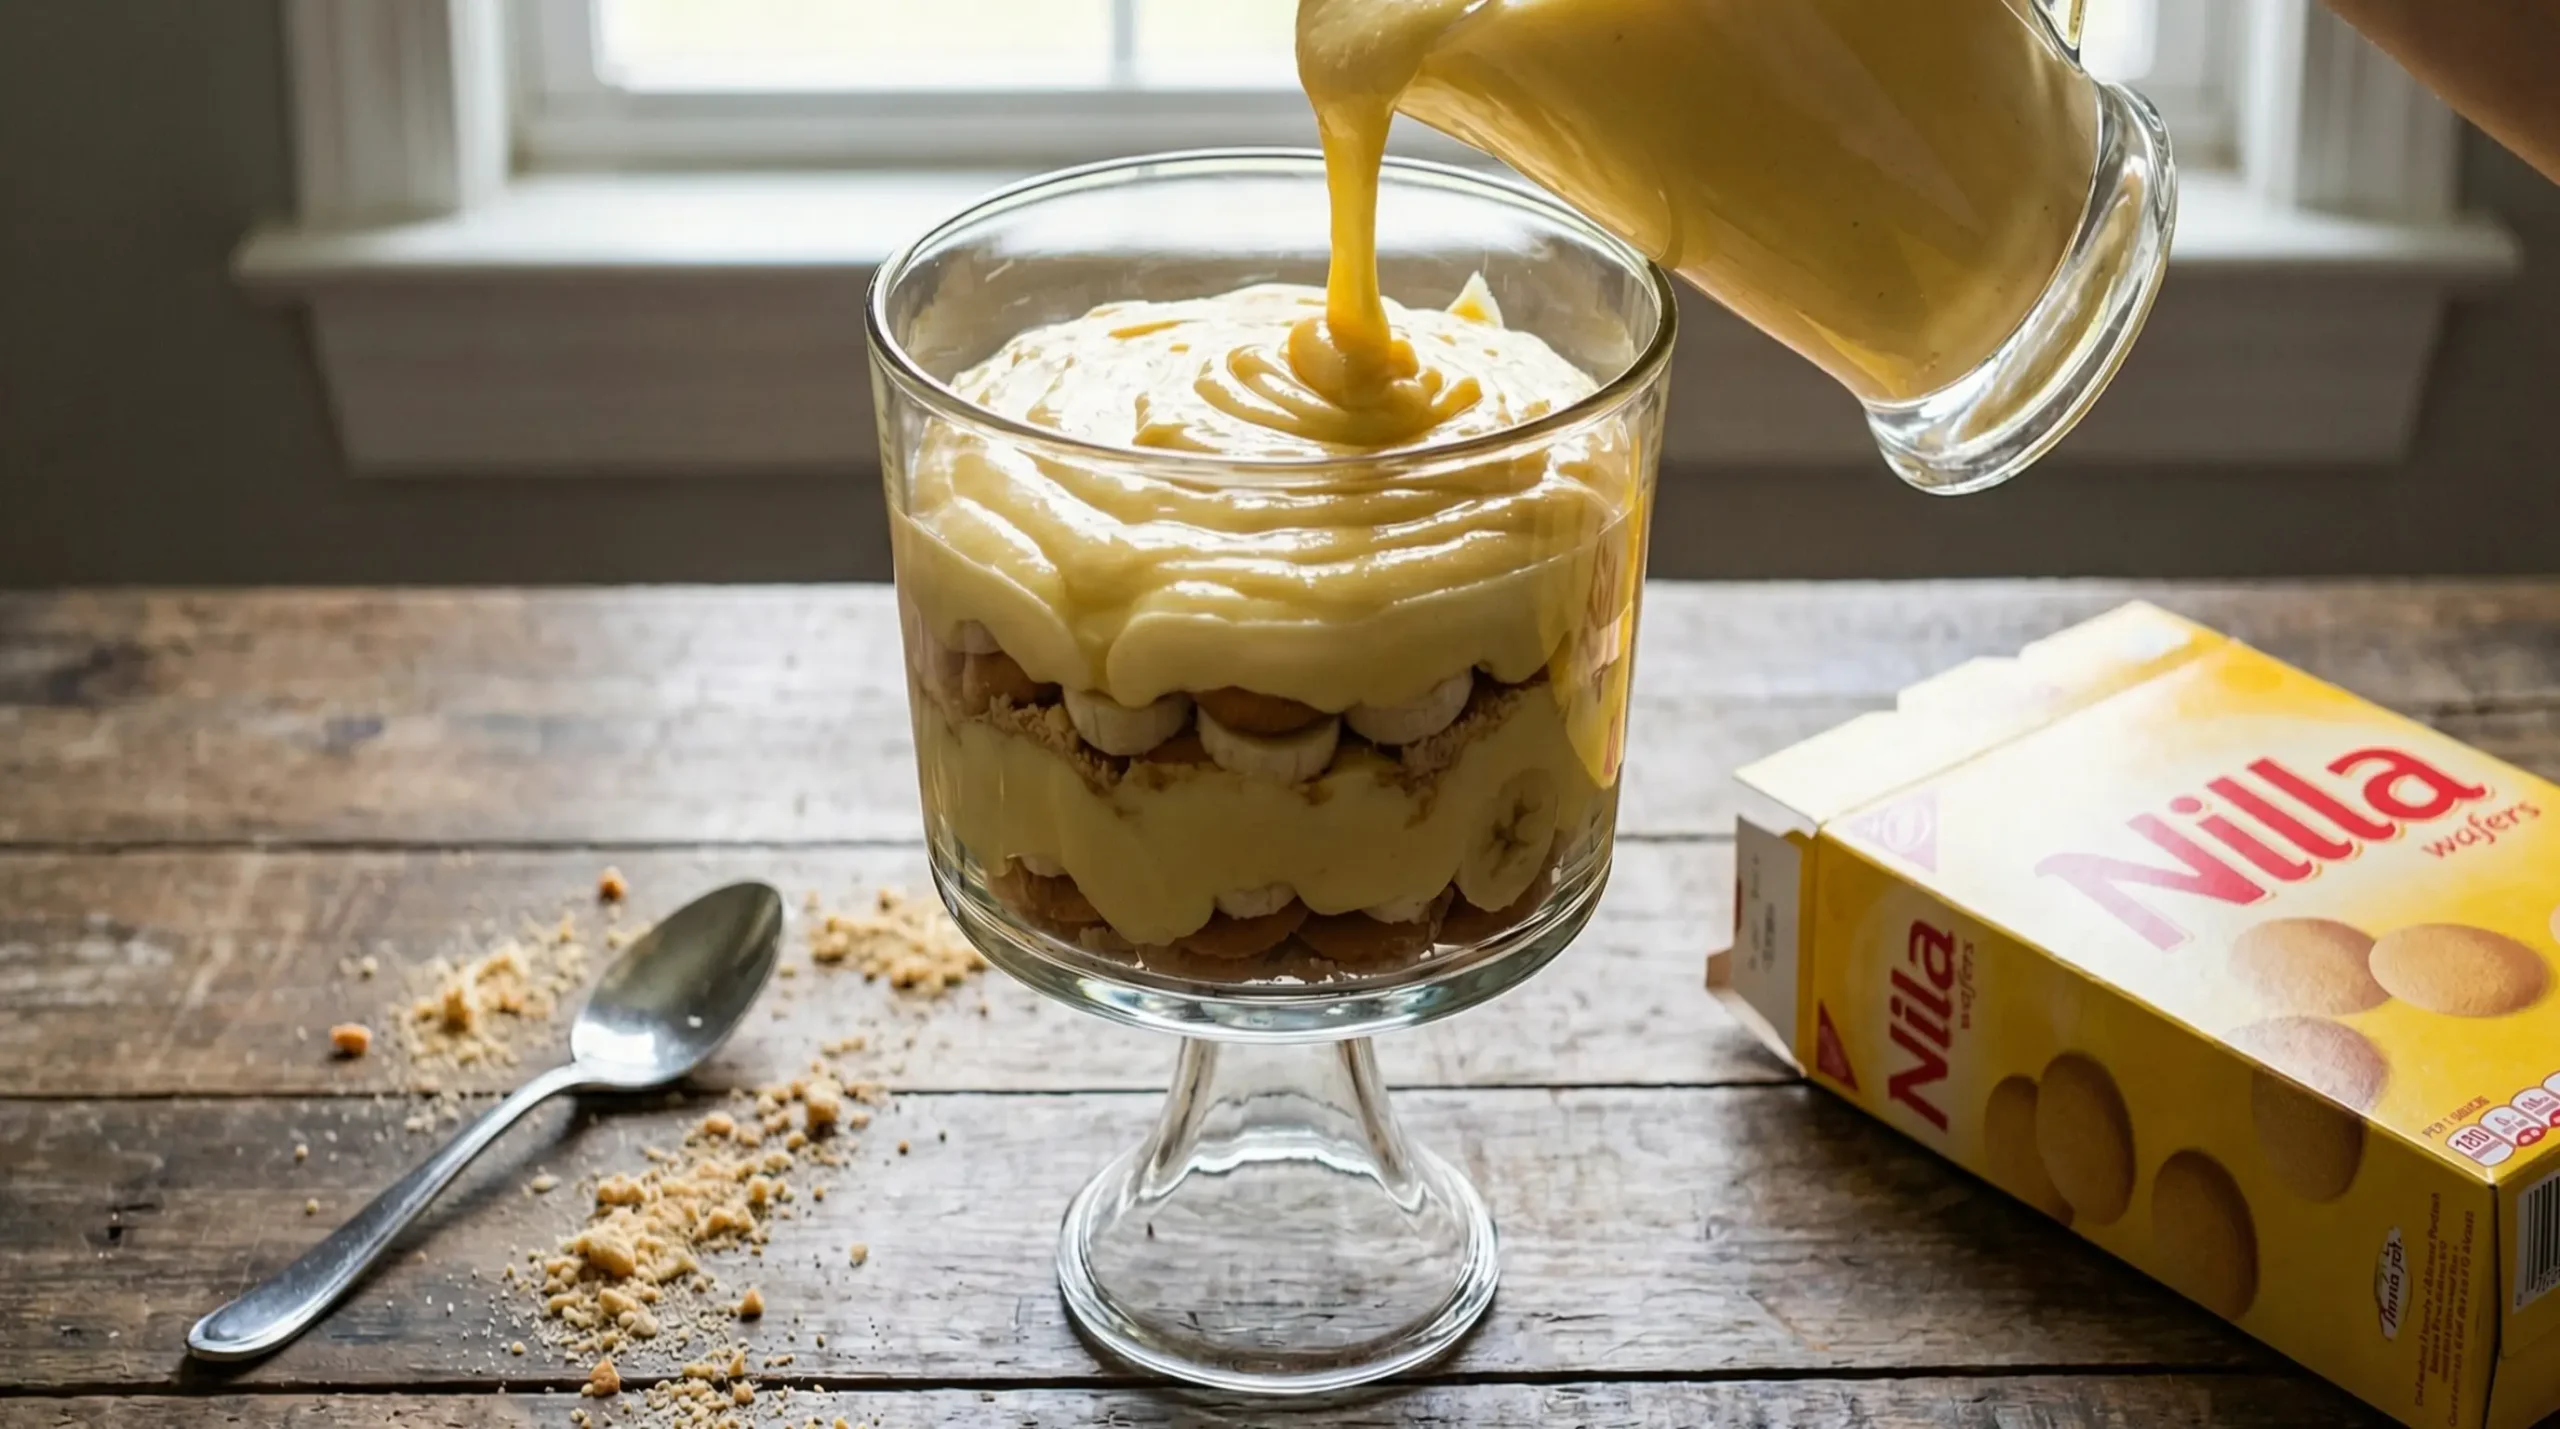
- Nilla Wafers (1 box, 11 oz): The classic choice. Their vanilla flavor and light crisp texture become soft after resting in the custard overnight.
- Heavy whipping cream (2 cups / 480ml): For the homemade whipped cream topping. Alternatively, one 8 oz tub of Cool Whip works as a direct substitute.
- Powdered sugar (3 tablespoons): Sweetens and stabilizes the whipped cream.
- Vanilla extract (1 teaspoon): For the whipped cream topping.
Ingredient Tips Before You Start This Easy Banana Pudding Recipe
Banana ripeness matters more than most people realize. Underripe bananas taste starchy and bland inside the pudding. Heavily overripe bananas become mushy and unpleasant in texture. The sweet spot is yellow with small brown spots, giving maximum flavor with a firm enough texture to hold their shape in the layers.
For the from-scratch version: Make sure your egg yolks are at room temperature before you begin. Cold yolks are harder to temper smoothly and increase the risk of scrambling when the hot custard is added.
How to Make This Easy Banana Pudding Recipe From Scratch
The from-scratch method of this easy banana pudding recipe produces a custard that is richer and more flavorful than anything from a box. The key is constant stirring and patience. The custard cannot be rushed, but it is forgiving as long as you do not walk away from the stove.
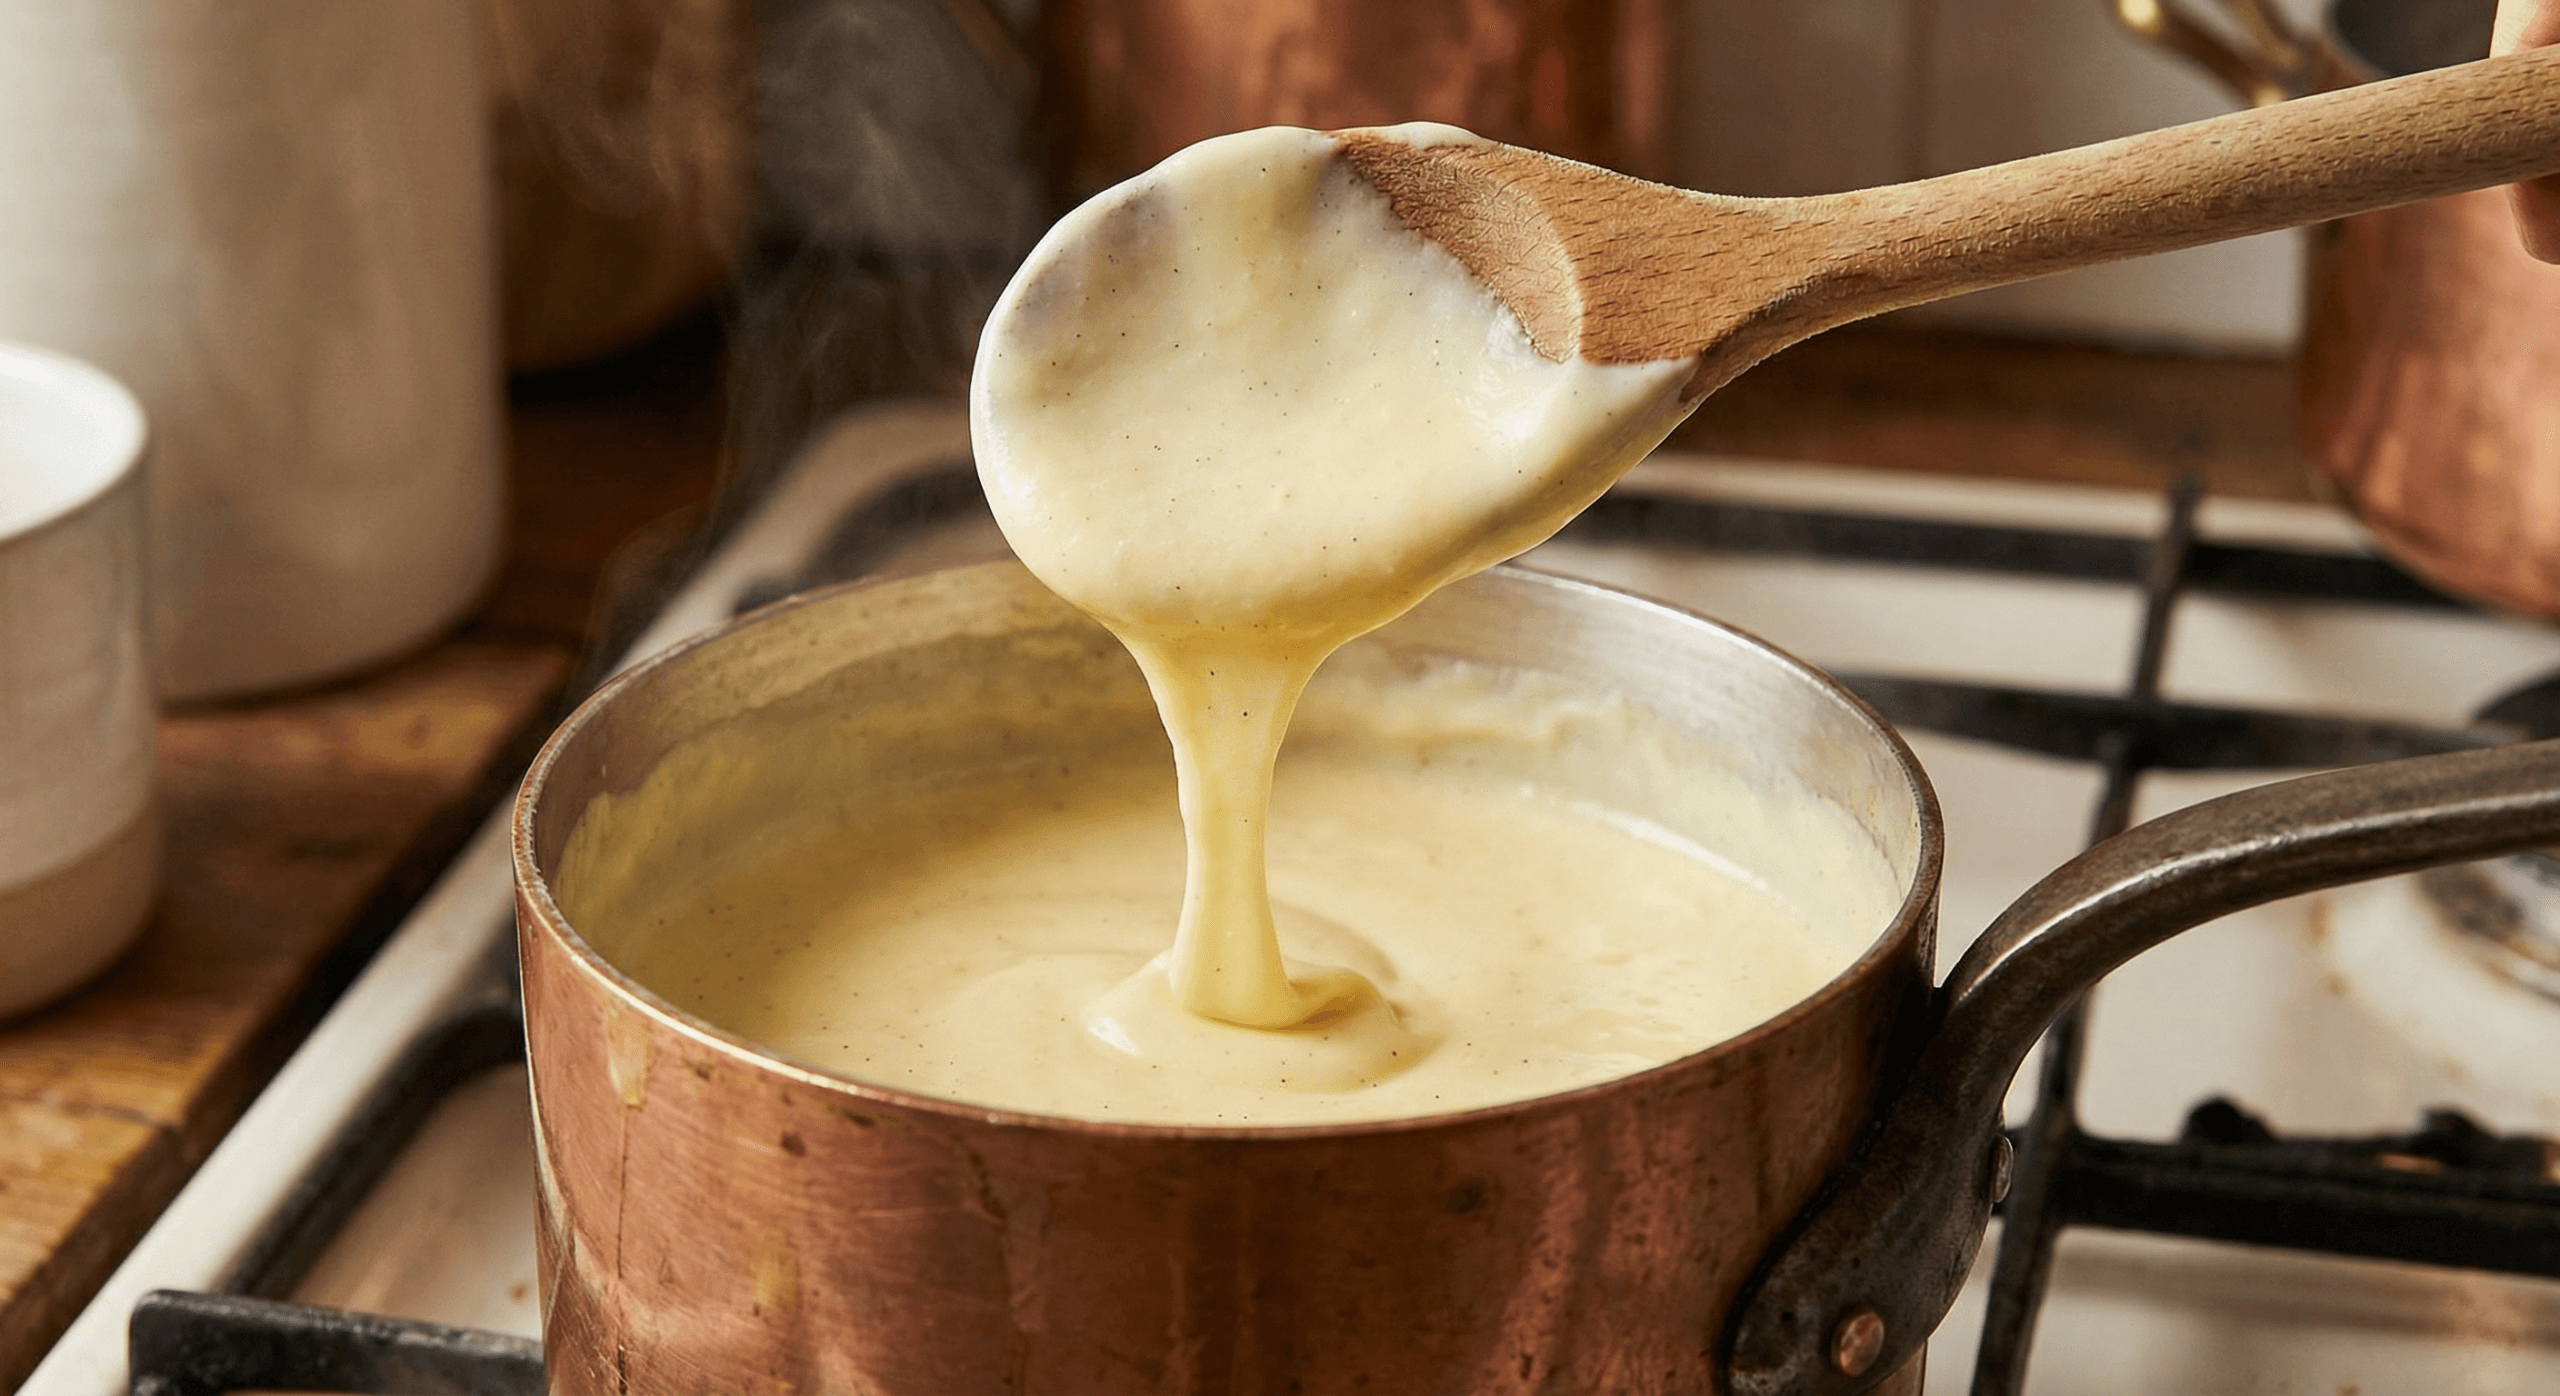
Step 1: Make the Custard Base
- Combine dry ingredients: In a medium heavy-bottomed saucepan, whisk together the granulated sugar, flour, and salt until evenly mixed.
- Add the milk gradually: Pour in the whole milk in a slow, steady stream while whisking constantly. Make sure no lumps of flour remain before moving to the heat.
- Cook over medium heat: Stirring constantly with a wooden spoon or silicone spatula, cook the mixture until it thickens and just begins to bubble, about 10 to 12 minutes. Do not turn up the heat to speed this up; medium heat is important to avoid scorching the bottom.
- Check for thickness: The custard is ready when it coats the back of a spoon and holds a clean line when you draw your finger through it.
Step 2: Temper the Egg Yolks
- Beat the yolks lightly in a separate bowl until smooth.
- Slowly ladle about 1 cup of the hot custard into the egg yolks, pouring in a thin stream while whisking constantly. This step, called tempering, gently raises the temperature of the eggs without scrambling them.
- Pour the tempered egg mixture back into the saucepan with the remaining custard, whisking to combine.
- Return to medium heat and cook for an additional 2 minutes, stirring constantly, until the custard thickens further and any raw-egg flavor is cooked out.
If you see small lumps of scrambled egg: Immediately remove the pan from heat and pour the custard through a fine-mesh strainer. This salvages the custard completely, so do not discard it. The strained custard will be smooth.
Step 3: Finish and Cool the Custard
- Remove from heat. Stir in the unsalted butter and vanilla extract until the butter is completely melted and the custard is glossy and smooth.
- Prevent a skin from forming: Press a sheet of plastic wrap directly onto the surface of the custard, making sure it make full contact with no air pockets.
- Cool for 20–30 minutes at room temperature before assembling. The custard can be used warm, as it will set firmer as it chills in the assembled dish.
Make-Ahead Option: The custard for this easy banana pudding recipe can be made up to 2 days in advance and stored in the refrigerator with plastic wrap pressed directly on its surface. Bring to room temperature and whisk smooth before assembling.
Easy Instant Banana Pudding Recipe (Quick Version)
The instant pudding version of this easy banana pudding recipe takes about 5 minutes of hands-on work and tastes much better with one simple upgrade: beating in softened cream cheese. This technique, used widely in Southern kitchens, adds body and richness that transforms a basic pudding mix into something that rivals the from-scratch version.
- Beat the cream cheese in a large bowl on medium speed until completely smooth, with no lumps. This step is important; lumpy cream cheese will not incorporate properly into the pudding.
- Add the sweetened condensed milk and beat on low speed until fully combined and smooth.
- In a separate bowl, whisk both packets of instant vanilla pudding mix with 3 cups of cold milk for 2 full minutes until thickened.
- Fold the pudding mixture into the cream cheese mixture with a spatula until fully combined and uniform in color and texture.
- Fold in 1 cup of whipped cream (or one third of a Cool Whip tub) to lighten the mixture.
- Use immediately for assembly, as the mixture will continue to firm up as it rests.
Skip the cream cheese? You can. Just mix the two pudding packets with cold milk, let stand 5 minutes, then fold in an 8 oz tub of Cool Whip. This is the quickest version of this easy banana pudding recipe and still produces a crowd-pleasing result, though it will be lighter in texture and flavor than the cream cheese upgrade.
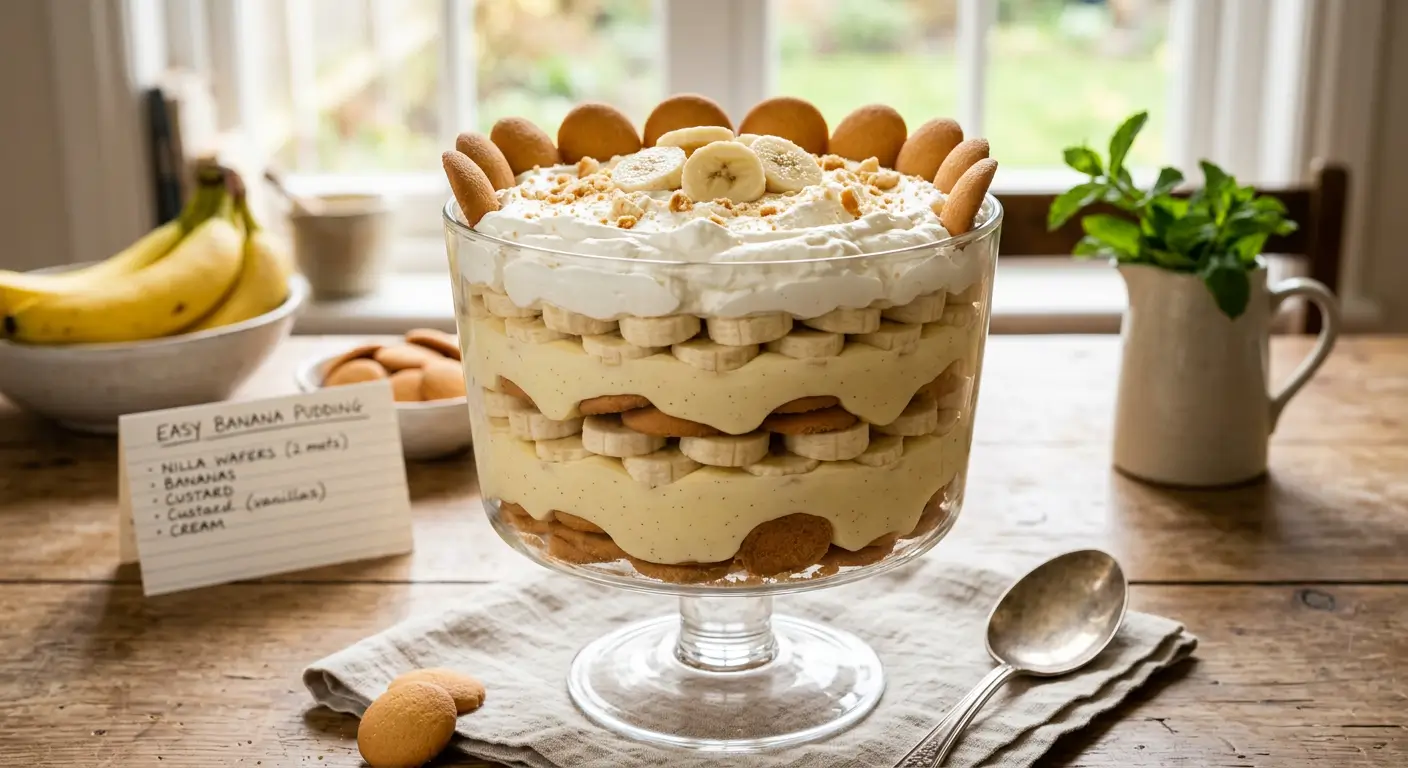
How to Layer This Easy Banana Pudding Recipe
Assembly is where this easy banana pudding recipe comes together, and the order and method of layering matters for both flavor and presentation. Use a 9×13 inch baking dish for a family-style presentation, or a large glass trifle bowl to show off the beautiful layers.
- First layer – Nilla Wafers: Arrange a single layer of Nilla Wafers on the bottom of your dish, covering it completely. They can slightly overlap.
- Second layer – Bananas: Slice bananas into rounds about ¼-inch thick and arrange them in a single, even layer over the wafers.
- Third layer – Custard: Spoon or pour about one-third of the custard evenly over the banana layer, spreading it to the edges with a spatula.
- Repeat the layers: Add another layer of Nilla Wafers, then bananas, then custard. Depending on your dish depth, you will get 2–3 complete layers.
- Final custard layer: End with a generous layer of custard on top, completely covering all bananas to prevent browning.
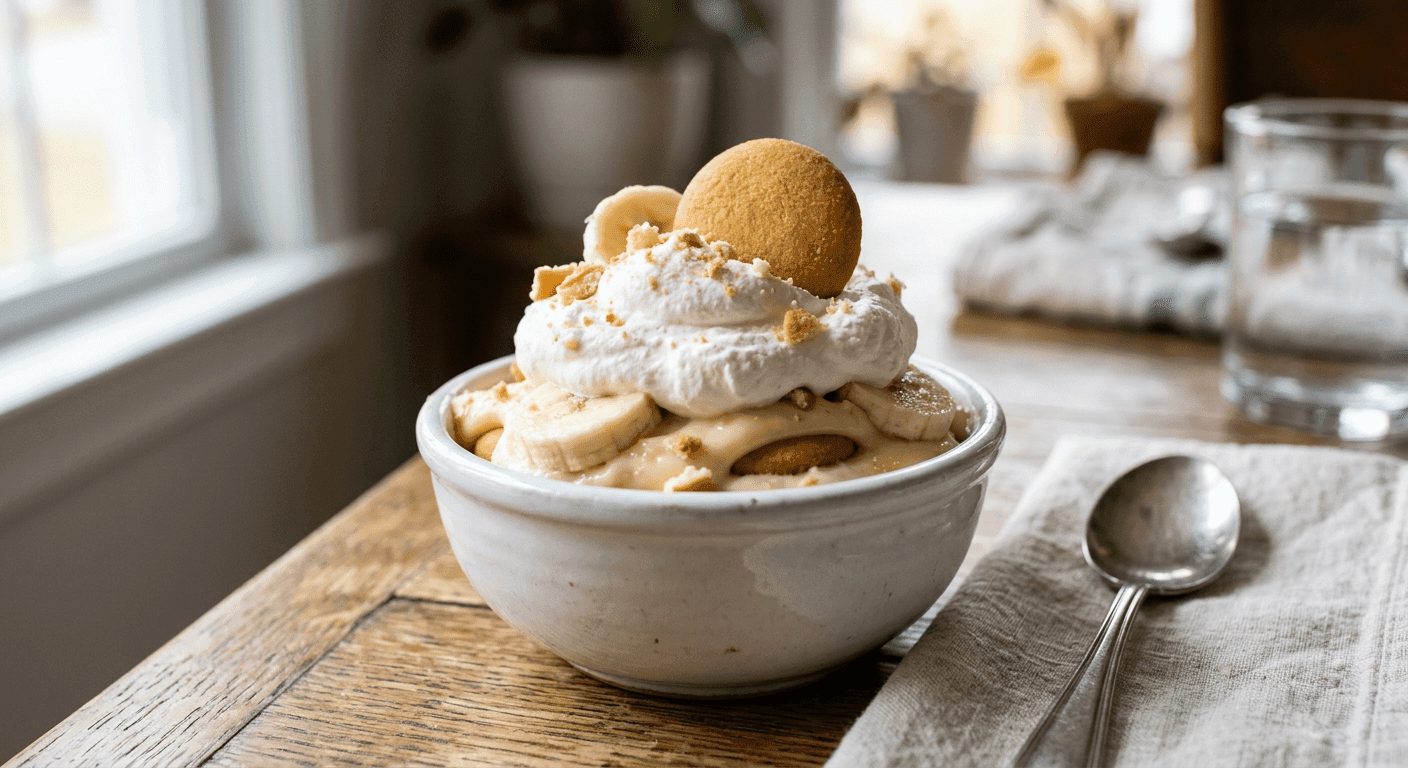
- Add whipped cream: Spread the whipped cream (or Cool Whip) in an even layer over the top of the custard.
- Garnish: Crush a handful of Nilla Wafers over the whipped cream, or press a few whole wafers into the top decoratively.
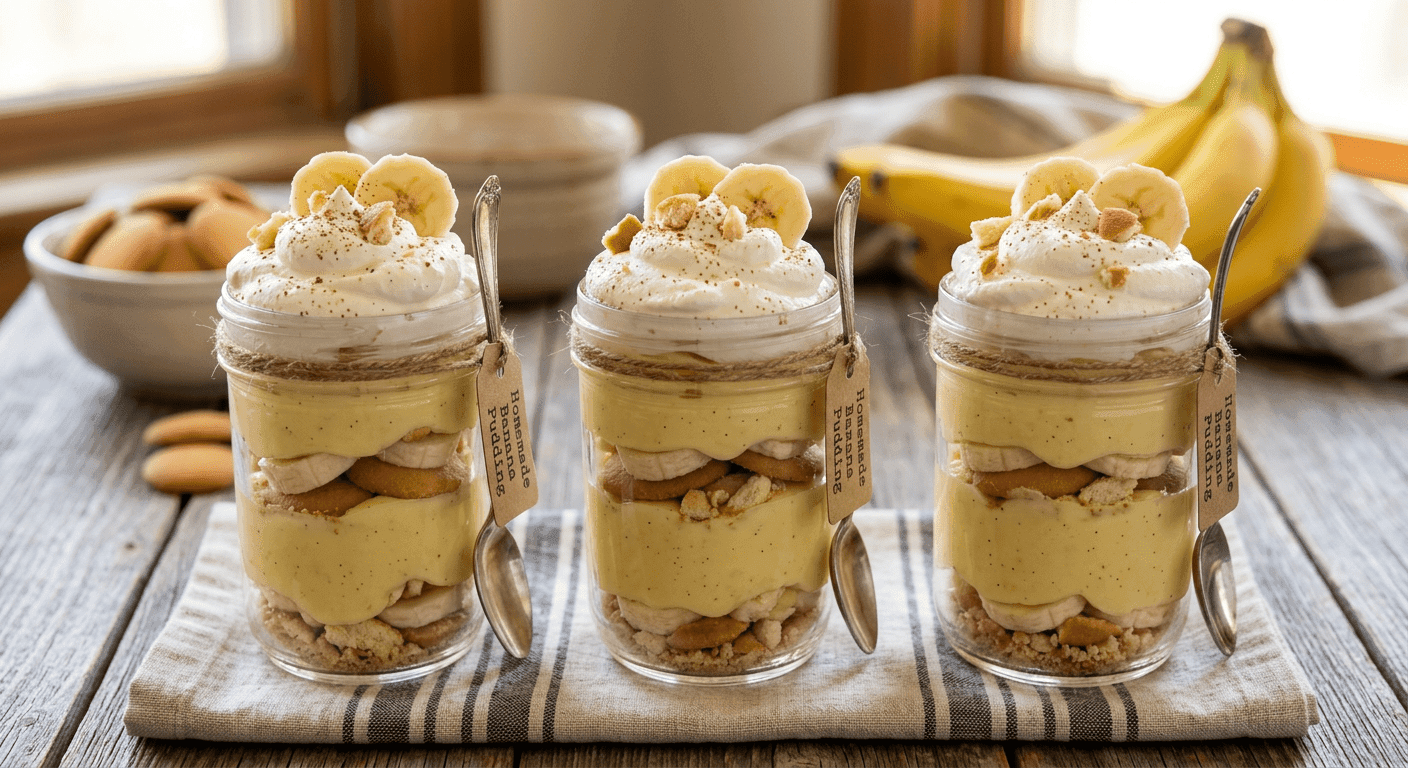
Trifle Bowl Tip: A glass trifle bowl shows off the layers beautifully and makes this easy banana pudding recipe look stunning on any table. Press the Nilla Wafers and banana slices against the inside of the glass when building the outer layers so they are visible from the outside.
Chill Time: Do Not Skip This
Cover the assembled pudding tightly with plastic wrap and refrigerate for a minimum of 2 hours. Four hours is better. Overnight is best. The chilling time is not optional. That is when the Nilla Wafers absorb the custard and transform from crispy cookies into the soft, custardy layers that define a great banana pudding. Cutting this time short produces a dish where the cookies are still crunchy and the layers have not had time to meld together.
Pro Tips for This Easy Banana Pudding Recipe
Technique Tips
- Stir constantly when making custard. Even 30 seconds without stirring can scorch the bottom of the pan, which leaves a burnt flavor that cannot be fixed.
- Use a heavy-bottomed saucepan. Thin-bottomed pots heat unevenly and greatly increase the risk of scorching. A Dutch oven or stainless steel saucepan works best.
- Do not rush the tempering step. Pour the hot custard into the eggs very slowly, as a thin drizzle, not a splash. Rushing this causes scrambled eggs.
- Taste and adjust. After adding vanilla, taste the custard and adjust sugar if needed.
Assembly & Serving Tips
- Cover bananas completely with custard. Any banana surface exposed to air will oxidize and turn brown. Full custard coverage prevents this entirely.
- Garnish right before serving. Add fresh banana slices and any extra Nilla Wafers as garnish immediately before the dish goes to the table, not when assembling.
- Stabilize your whipped cream. Add ½ teaspoon of cream of tartar or 1 tablespoon of instant vanilla pudding mix to the cream while whipping. This keeps homemade whipped cream from deflating for hours.
- For clean portions: Use a sharp spoon or spatula and serve in individual bowls rather than trying to cut slices from a soft pudding dish.
Easy Banana Pudding Recipe Variations
The classic easy banana pudding recipe is hard to beat, but these variations are all worth trying once you have the base down.
Flavor Variations
- Magnolia Bakery-Style: Use the cream cheese + sweetened condensed milk + instant pudding method described in the instant version above. This is the famous New York bakery’s approach and produces a very creamy, rich result.
- Peanut Butter Banana Pudding: Swirl 3 tablespoons of peanut butter into the warm custard off the heat, or layer thinly spread peanut butter cookies in place of Nilla Wafers.
- Chocolate Banana Pudding: Replace the vanilla custard with chocolate pudding (add ¼ cup cocoa powder to the from-scratch custard, or use chocolate pudding mix for the instant version). Pairs very well with sliced bananas.
- Caramel Banana Pudding: Drizzle a layer of caramel sauce between each custard and banana layer before assembling. A sprinkle of flaky sea salt on the whipped cream topping is the finishing touch.
- Coconut Banana Pudding: Replace ½ cup of the milk with coconut cream in the custard, and substitute toasted coconut flakes for some of the Nilla Wafer garnish.
Dietary Adaptations
- Dairy-Free: Substitute oat milk or full-fat coconut milk for the whole milk in the custard. Use vegan butter. Replace the whipped cream with coconut whipped cream (chilled full-fat coconut cream whipped with a little powdered sugar).
- Gluten-Free: Replace the flour in the custard with cornstarch (use 3 tablespoons of cornstarch instead of ⅓ cup flour). Substitute gluten-free vanilla cookies for the Nilla Wafers.
- Lower Sugar: Reduce the sugar in the custard to ½ cup and rely on ripe bananas for natural sweetness. Using unsweetened whipped cream on top also reduces the total sugar content significantly. For helpful guidance on reducing sugar in desserts, the American Heart Association’s resources on added sugars offer useful context.
- Mini Individual Cups: Assemble in individual mason jars or clear cups for a beautiful single-serving presentation, perfect for parties. Layer 3–4 wafers, banana slices, and custard in each jar and top with whipped cream just before serving.
Make-Ahead, Storage & Freezing
- Make-ahead (recommended): This easy banana pudding recipe genuinely tastes better when made 12–24 hours in advance. The overnight rest allows the Nilla Wafer layers to fully soften and the flavors to meld together completely. Assemble the full dish through the whipped cream layer, cover tightly with plastic wrap, and refrigerate overnight. Add any fresh banana or cookie garnish right before serving.
- Refrigerator storage: Covered tightly, banana pudding keeps well for up to 3 days. The texture of the bananas and wafers will continue to soften over time. By day 3, the wafers will be very soft and the bananas may begin to darken slightly, though it is still safe to eat but best consumed within the first 2 days for peak quality. For food safety best practices around dairy-based desserts, refer to the FDA’s safe food storage guidelines.
- Freezing (not recommended): Banana pudding does not freeze well. The custard breaks and separates when thawed, the bananas become mushy and brown, and the Nilla Wafers turn to a completely soggy mass. The only component that freezes acceptably is the custard alone (without bananas or wafers), stored in an airtight container for up to 1 month.
- Transporting to a gathering: Assemble the pudding in a dish with a tight-fitting lid, or cover very well with plastic wrap. Keep it refrigerated right up until serving time. Add the whipped cream and garnish at the destination if possible.
Easy Banana Pudding Recipe Card
Classic Easy Banana Pudding (From Scratch)
Silky homemade vanilla custard layered with fresh banana slices and Nilla Wafers, topped with pillowy whipped cream. The definitive American Southern dessert, made simple.
Prep Time: 15 minutes
Cook Time: 15 minutes
Chill Time: 2 hours minimum (overnight recommended)
Total Time: 2 hours 30 minutes
Yield: 10–12 servings
Category: Dessert
Nutrition (per serving)
| Calories | Fat | Carbs | Protein |
|---|---|---|---|
| 380 | 18g | 52g | 6g |
Ingredients
Vanilla Custard:
- ¾ cup (150g) granulated sugar
- ⅓ cup (40g) all-purpose flour
- ¼ teaspoon salt
- 3 cups (720ml) whole milk
- 3 large egg yolks, room temperature
- 2 tablespoons unsalted butter
- 2 teaspoons pure vanilla extract
Layers:
- 1 box (11 oz / 312g) Nilla Wafers
- 4–5 ripe medium bananas, sliced into ¼-inch rounds
Whipped Cream Topping:
- 2 cups (480ml) heavy whipping cream, cold
- 3 tablespoons powdered sugar
- 1 teaspoon pure vanilla extract
Instructions
1. Make the Custard:
- In a heavy-bottomed medium saucepan, whisk together the sugar, flour, and salt until combined.
- Gradually pour in the whole milk while whisking, ensuring no flour lumps remain.
- Cook over medium heat, stirring constantly, until the mixture thickens and just starts to bubble, about 10 to 12 minutes.
- In a bowl, lightly beat the egg yolks. Slowly ladle about 1 cup of the hot custard into the yolks, whisking constantly (tempering).
- Pour the egg mixture back into the saucepan. Cook over medium heat for 2 more minutes, stirring constantly, until thickened further.
- Remove from heat. Stir in butter and vanilla until butter is melted and custard is smooth and glossy.
- Press plastic wrap directly onto the surface of the custard. Cool 20–30 minutes at room temperature before assembling.
2. Make the Whipped Cream:
- In a chilled bowl, combine the cold heavy cream, powdered sugar, and vanilla.
- Beat on medium speed until thickened, then increase to medium-high and beat until soft to medium peaks form.
- Do not overbeat. Stop when the cream holds a soft peak that slightly droops.
3. Assemble:
- In a 9×13 inch dish or large trifle bowl, arrange a single layer of Nilla Wafers covering the bottom.
- Layer banana slices evenly over the wafers.
- Spoon about one-third of the custard over the bananas and spread evenly.
- Repeat the layers (wafers → bananas → custard) until ingredients are used up, ending with a custard layer that fully covers all bananas.
- Spread the whipped cream evenly over the top.
- Garnish with crushed or whole Nilla Wafers.
4. Chill:
- Cover tightly with plastic wrap. Refrigerate for at least 2 hours, or overnight for best results.
- Add any fresh banana garnish just before serving to prevent browning.
Quick Instant Pudding Version
- Beat 8 oz softened cream cheese until smooth. Add one 14 oz can sweetened condensed milk; beat until smooth.
- Whisk 2 packages (3.4 oz each) instant vanilla pudding mix with 3 cups cold milk for 2 minutes until thickened. Fold into the cream cheese mixture.
- Fold in one 8 oz tub Cool Whip (or 2 cups whipped cream) to lighten.
- Assemble exactly as above. Chill overnight.
Notes
- Bananas: Use yellow bananas with light brown speckles, sweet but still firm.
- Anti-browning: Cover banana slices fully with custard during assembly. Add garnish bananas just before serving.
- Storage: Refrigerate covered up to 3 days. Best consumed within 2 days. Do not freeze.
- Cool Whip substitution: One 8 oz tub of Cool Whip replaces 2 cups of whipped heavy cream.
Easy Banana Pudding Recipe: Frequently Asked Questions
Can I make banana pudding the night before?
How do you keep bananas from turning brown in banana pudding?
What is the difference between homemade and instant banana pudding?
Can I use Cool Whip instead of whipped cream?
How long does banana pudding last in the refrigerator?
Can I make banana pudding without Nilla Wafers?
Why is my banana pudding runny?
What kind of bananas are best for banana pudding?
Ready to Make This Easy Banana Pudding Recipe?
Whether you choose the rich from-scratch custard version or the quick and easy instant pudding method, this easy banana pudding recipe delivers the kind of comfort-food dessert that disappears fast at any table. The key is simple: ripe bananas, quality vanilla, real Nilla Wafers, and patience. Give it time to rest in the refrigerator and every layer will reward you.
Make this easy banana pudding recipe the night before, pull it out of the refrigerator right before dinner, add the garnish, and watch it vanish. That is what great banana pudding does.

Love Banana Desserts? Try These Next
From our rich Banana Pudding Cheesecake to easy no-bake treats. Explore more dessert recipes at Dessert Recipes Lab.
Explore More Dessert Recipes